I'm sure most of the people reading this must've heard of the Raspberry Pi. No? What?! Have you been living on Mars?! So even if you've not heard of it, I'm gonna tell you all about it in this post.
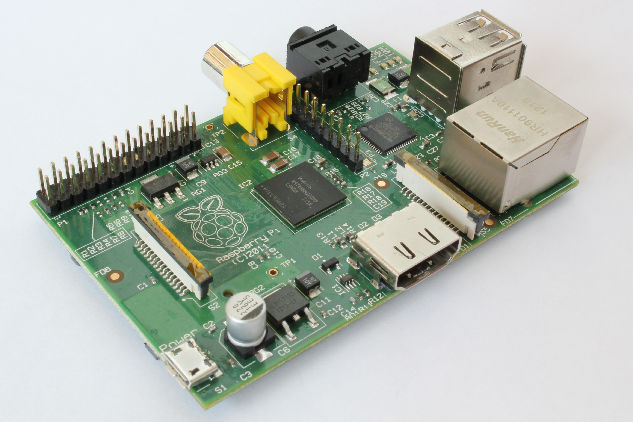
The Raspberry Pi is basically a credit card sized computer that was developed with the intention of helping students learn programming and developing their own applications with them. Well, I must say, it has succeeded phenomenally in that respect. The board has a Broadcom BCM2835 SoC design, which includes an ARM1176JZF-S 700 MHz processor, VideoCore IV GPU, a RAM of 256MB (later upgraded to 512MB). It has no hard drive but uses an SD card for storage. The Raspberry Pi foundation currently provides a Debian linux based operating system called the Wheezy Raspbian. There are tools planned for supporting python as the main programming language.
The Raspberry Pi, is a very powerful package with which you can have fun and learn at the same time! It can also play full 1080p movies!
Here is a Voice Controlled Robotic Arm built using the Raspberry Pi .
You can order your Raspberry Pi from element14.com.
The potential applications for this great computer are indefinite. Some of these are
- Home Automation
- Robotics
- Media Streaming
- Gaming Arcade
- etc!
So you got your Raspberry Pi and you know that it is some kind of a computer, but how to set it up?!
The basic things you need are
- A keyboard
- A mouse
- A microUSB charger (any android charger will do)
- An HDMI cable (To use a monitor)
- An Ethernet Cable for internet access
- An SD card for storing the boot image
Install the Boot image on the SD card
Now, I'm assuming you all have windows installed on your computer.
The software I'm going to use is the Win32DiskImager, which can be downloaded from here once you've done that, you can download the Raspbian OS image from here. Unzip both of them(preferably in the same directory). Insert the SD card into your reader, and then fire up the Win32DiskImager from the binary folder. As soon as the program is executed you will see an error. Ignore that. Now select the Raspbian image by clicking the blue folder icon and navigating to the folder you unzipped. Then select your SD card from the devices and click Write, and lean back sip some coffee while your linux is loaded. When the progress is complete, take out the SD card. Behold the card! For it holds the key to unlocking a pandoras box full of inventions!
No plug in your sd card into the Raspberry Pi and power it up! You'll be greeted by a something called a 'raspi-config'. Nothing too fancy, just a configuration tool, where you need to change some options.

First up, select expand_rootfs, then ok. What this does is adjust your partition to utilize your card space fully. You don't want that extra space left out now do you?

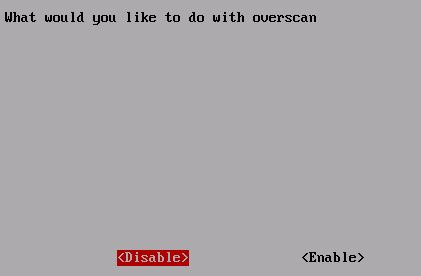
Next, enable the Overscan. It adjusts the screen size of the linux to use all of your monitor real estate. If however, your screen is already full then don't care about this.
Now comes the most important part, setting up your keyboard. Press enter on the configure_keyboard option and just press enter again! The 105-key option is good for you. Then select other if you keyboard is different that a UK layout. After that select the English(US) option. Select default on the next and 'no compose key' after that. The last option is to set ALT/CTRL/BACKSPACE to kill the GUI. This would help if the linux crashed and you want to put it back up without rebooting.
You can keep a new UNIX password by going to change_pass and typing in a new password.
Then you need to set your locale. Just deselect the en_GB option and select the option in which the two letters match your country's. Then select the region and the timezone and that's it! You're done!

On the main menu, select finish and reboot! Now take a moment and look at what you have done! You've just opened a pandora's box full of new opportunities in learning and having fun!
After the system reboots, type in pi as your login and then the password you set earlier. Then type in startx to start the GUI session. And there it is! The LXDE window manager. Now you can treat it like a normal computer! Watch movies, play games, surf the web.

But of course, if you want to develop something using it, then Python is your best friend! You can fire up the IDLE 3 kept on the desktop and use it to develop apps for your Pi. For tutorials on Python Programming Language, head out to the official Python website. You can also buy a GertBoard, to go to increase you GPIO pins, so that you can connect more sensors and peripherals to it. And for those interested in Robotics, just imagine what all you can do with so powerful a processor!! Oh wait, you can also interface to board with Arduino!!
Personally, I would love to load the BackTrack Linux on it and be hacking everyone!
Here's a list of all the Operating systems that this Board Supports-
- AROS
- Android 4.0 (Ice Cream Sandwich)
- Arch Linux ARM
- Debian Squeeze
- FreeBSD
- Firefox OS
- Gentoo Linux
- Google Chrome OS
- NetBSD
- Raspberry Pi Fedora Remix
- Open webOS
- Raspbian (Debian Wheezy port with faster floating point support)
- RISC OS
- Slackware ARM (formerly ARMedslack)
- QtonPi a cross-platform application framework based Linux distribution based on the Qt framework
I'll be putting up tutorials on using the Pi, from time to time. So keep checking!
You can also subscribe to this site by using the RSS feed at the top of the page. Interact with the social widget on the right!
Cheers!!


0 comments:
Post a Comment
Do Comment on Anything you like or dont like!